Overview & Specs
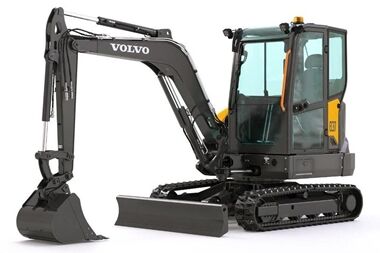
The Volvo EC37 is a compact excavator to evaluate when recurring property or landscape work rewards a conventional upper structure, a comfortable operating station and a carefully matched digging package. It is especially useful to compare directly with the short-radius ECR40: the two share a platform, so the decision can focus on the actual working space instead of assuming that a different model number means an entirely different performance class.
For a Canadian buyer, the EC37’s strongest case is a verified fit with the normal excavation cycle and site layout. It should not be selected solely from maximum depth or a claim that a conventional tail always lifts more. The applicable working-range drawing, load chart, attachment arrangement and demonstration provide the evidence for the specific job.
For an owner who alternates operators, include a handover test in the demonstration. Have each operator identify the selected attachment setting, locate the relevant controls and explain the planned work sequence before starting. Time lost to unclear setup can outweigh a small difference in cycle speed. This is a purchasing and training check, not evidence that the EC37 has a particular usability defect.
On This Page
ToggleIdentify the EC37 generation
Volvo introduced the EC37 and ECR40 to North America in its January 2024 announcement. It identifies the EC37 as the conventional-layout model and the ECR40 as short radius. The technical drawing for the current EC37 uses EC37F. Do not substitute EC35D data for a machine simply because a used listing describes both as similar compact excavators.
The Canadian product page lists 24.8 gross hp and 8,345 lb operating weight. Its engine-speed line differs from the linked guide: the guide associates maximum power with 2,200 rpm and maximum torque with 1,500 rpm. Use the applicable manual for operation and preserve the distinction rather than assigning the torque-speed entry to rated power.
Working figures with their conditions
| Item | Short arm | Long arm |
|---|---|---|
| Arm length | 1,400 mm | 1,700 mm |
| Maximum digging depth, blade up | 3,133 mm | 3,433 mm |
| Ground-level reach | 4,961 mm | 5,247 mm |
| Arm tearout force | 5,078 lbf | 4,411 lbf |
The Canadian-linked EC37 guide lists 1,780 mm overall width, 1,270 mm tail radius and an optional counterweight adding 80 mm of overhang. Its 3,785 kg operating-weight configuration includes a heated cab, short arm, 300 mm rubber tracks and a 600 mm direct-fit bucket. Keep those assumptions attached to comparisons.
When conventional geometry is a sensible choice
If the regular work happens in open areas with suitable room for rotation, a conventional layout may fit the job without paying particular attention to minimising rear projection. That does not mean rear clearance can be ignored. It means the constraint should be measured rather than assumed to dominate every purchase.
Map the working area separately from the access route. The machine might fit through an entrance while lacking sufficient room to rotate at the destination. Conversely, a site with a narrow entrance can open into a spacious work area where the rear outline is less restrictive.
The EC37 and ECR40 comparison is useful because their published widths are the same in the cited guides. Do not apply a blanket rule that every short-radius alternative is wider. Compare the dimensions of the actual candidates, including fitted counterweights and the front equipment’s movement.
For a mixed work portfolio, estimate how often restricted rear clearance genuinely affects the sequence. A feature used on one exceptional job should be weighed differently from a constraint encountered every week. Rental of a different machine for occasional work can be included in the ownership comparison.
Choose the arm from the production zone
The long arm adds 300 mm to the cited blade-up depth and 286 mm to ground-level reach, while the corresponding arm-force entry is lower. These changes identify a tradeoff; they do not establish a universal gain or loss in productivity.
Start by marking the working points used repeatedly. If the short-arm configuration already reaches them comfortably from appropriate positions, additional reach may not address the main delay. Bucket filling, material condition, repositioning and discharge can still govern completion time.
If the work genuinely requires the longer envelope, assess the entire cycle at that geometry. The teeth reaching a point is not enough. The bucket must make the intended cut, curl, clear the excavation and discharge usefully. Keep the actual coupler and bucket in the assessment.
Aglist’s dig depth and reach guide explains why maximum horizontal and vertical figures cannot be combined into a rectangular working area. Machine selection follows the appropriate site positions, not the reverse.
Operator-intensive work: test control and visibility
For recurring work, operator accommodation is a practical productivity question. The Canadian page describes proportional fingertip controls, configurable hydraulic settings and a display-based interface. Those features deserve a task-based demonstration rather than being accepted as automatic improvements.
Set the seat and controls for the regular operator, then assess visibility toward the bucket, both tracks and the surrounding work area. Include entry and exit, where the machine will be parked, and the normal attachment-changing routine. A comfortable seated position is only part of a workable day.
Where several operators share the machine, establish how settings will be recorded and selected. A useful configurable system should support a consistent approved attachment setup, not leave the next operator guessing which values were used. Keep the attachment identity and required settings together in the equipment records.
Do not interpret easy controls as a replacement for training. A smooth unloaded demonstration can conceal how the machine feels when several functions are used through a real working cycle. Arrange a controlled demonstration with a competent operator and suitable conditions.
Measure whole-job time
Suppose a hypothetical job requires 320 comparable cycles. A three-second difference per cycle amounts to 960 seconds, or 16 minutes. If one setup also requires 25 minutes more positioning or attachment preparation, the apparently faster digging cycle may not produce the shorter job.
These figures are illustrative assumptions, not tested EC37 results. Their purpose is to make the demonstration more informative. Record active excavation, repositioning, waiting, tool changes and finishing separately. That identifies which machine feature could realistically change the result.
Use comparable tools and material where possible. Different bucket fill, operator technique or spoil arrangements can overwhelm a small machine difference. A meaningful comparison records those conditions instead of presenting a single stopwatch number without context.
For a contractor, include the time needed to move between sites. For an acreage owner, include setup and restoration around the property. The useful machine is the one that completes the intended result efficiently, not simply the one with the fastest visible boom movement.
Hydraulic attachments: specify the circuit
The product guide separates 110 L/min maximum system flow from 65 L/min maximum accessory flow. An optional second accessory circuit is listed at 40 L/min. Those are different entries for different purposes; the total system figure should not be advertised as flow available to every attachment.
For the desired tool, identify accepted flow, pressure, return and control requirements, as well as mounting and carrier suitability. Confirm what is fitted to the actual machine. A tool requiring another function may need more than the primary hydraulic connections shown in a listing.
Put the complete installation in the quote: attachment, coupler, plumbing, controls and commissioning. A lower attachment-only price can be misleading when compared with a fully equipped package. If a hydraulic thumb is central to the work, use the thumb selection guide to assess it with the actual bucket and coupler.
Loading and lifting: separate evidence
For loading, measure the receiving vehicle and the useful discharge position. The bucket must clear the side and place material where it is needed, including any difference in standing elevation. Repositioning the vehicle repeatedly may become the bottleneck even when the excavator has ample digging reach.
For lifting, obtain the applicable chart for the exact configuration and task. Radius, height, orientation, blade position and attachment assumptions matter. Do not substitute digging force or an unlabelled “maximum lift” entry for that information.
If a particular placement task drives the purchase, identify it before choosing the arm and counterweight. A configuration selected for maximum reach may have different implications for that lift. The equipment should be evaluated as one complete arrangement rather than assembled from favourable numbers in several tables.
Canadian ownership and service planning
Volvo’s North American launch information states that this engine does not require a diesel particulate filter. That is a model-specific manufacturer statement, not a rule to apply to every compact excavator of similar horsepower. Maintain the actual engine and emissions equipment according to its own documentation.
Choose the operator environment around the working season and duration. Inspect installed climate and visibility equipment rather than assuming every cab package is identical. Cold-weather preparation should follow the applicable instructions for fuel, fluids, starting and warm-up.
Plan access for routine service and cleaning where the excavator will live. On a remote property, parts delivery and field support can affect downtime more than a minor specification advantage. Obtain a realistic service arrangement before treating a machine as economical to own.
Transport and used-machine assessment
Start transport planning with the defined weight configuration, then establish the actual equipped package. Account for attachments and counterweights without double counting items already included. Verify the trailer, towing vehicle and full load arrangement rather than relying on a nominal excavator size class.
A used EC37 inspection should begin with identity and installed equipment. Match the serial information, arm and counterweight to the documentation. Then have undercarriage wear, linkage, structure, hydraulic condition and repair quality assessed independently.
Observe normal operation after an appropriate start and warm-up, using a representative approved tool. Price identified repairs, missing parts, delivery and initial service. These checks assess the individual machine; they are not claims of a known EC37 failure pattern.
For alternative comparison questions, review Aglist’s Bobcat E32 and Bobcat E35 entries, then verify their exact manufacturer configurations. The comparison should preserve the intended work and site conditions across candidates.
Frequently asked questions
Is EC37F a different page-worthy model from EC37 here?
The cited guide uses EC37F as the technical designation for the current EC37. Confirm the actual machine identity rather than treating the suffix alone as another product.
Does the long arm improve every digging task?
No. Its reach and force figures differ. Evaluate the recurring working zone and complete cycle.
Is the EC37 narrower than the ECR40?
The cited guides list the same overall width. Their rear geometry differs, so assess both access and rotation separately.
Can the system pump figure be used for attachment matching?
Use the accessory circuit that supplies the tool and verify all other requirements.
What should decide the purchase?
A demonstrated fit with the normal job, appropriate site clearance, a complete attachment package and a practical ownership arrangement.
Share your experience
Help other Canadian buyers — leave a quick review for the
Volvo EC37
There are no reviews yet. Be the first one to write one.